Building an n8n Workflow with the Codeforces API and Google Sheets
This n8n workflow tracks students’ competitive programming progress by connecting the Codeforces API to Google Sheets. I walk through fetching submissions, calculating metrics, handling API errors, and updating the sheet.
Why Automate Codeforces Progress Tracking?
Recently, I started exploring workflow automation tools because I wanted to automate some tasks that I perform regularly. After a short search, I came across several options, including Zapier, Make, and n8n.
I had a few requirements in mind: the tool should be simple to use, easy to learn, supported by an active community, and available to test for free. I had already heard a lot about n8n, and a friend of mine had recently joined the company. Since I was also looking for different career opportunities, becoming familiar with the product seemed especially worthwhile.
Everything was pointing towards n8n, so I decided to give it a try. I started by building a simple workflow before moving on to something more complex.
The workflow
Around 2020, I was responsible for organizing training camps at my university for students who wanted to participate in ICPC contests. Each year, around 200 students would sign up for the camp, and tracking their progress throughout the training required considerable effort.
Managing 200 students is difficult, even for someone fully committed to the task, let alone someone with a full-time job. Since I have always enjoyed working with numbers and data, I developed several metrics to help evaluate the students’ progress. These included their Codeforces ratings, the number of problems they had solved, and the difficulty of those problems.
I already had a list of the students’ Codeforces handles, so I wrote a couple of scripts that used the Codeforces API to collect this data.
Of course, these values did not mean much on their own. I assigned different weights to problems and analyzed their tags to understand which topics each student was strongest in. However, I will not go into those details here. For this blog post, I will keep the workflow simple and focus on two metrics: the number of problems solved and their difficulty.
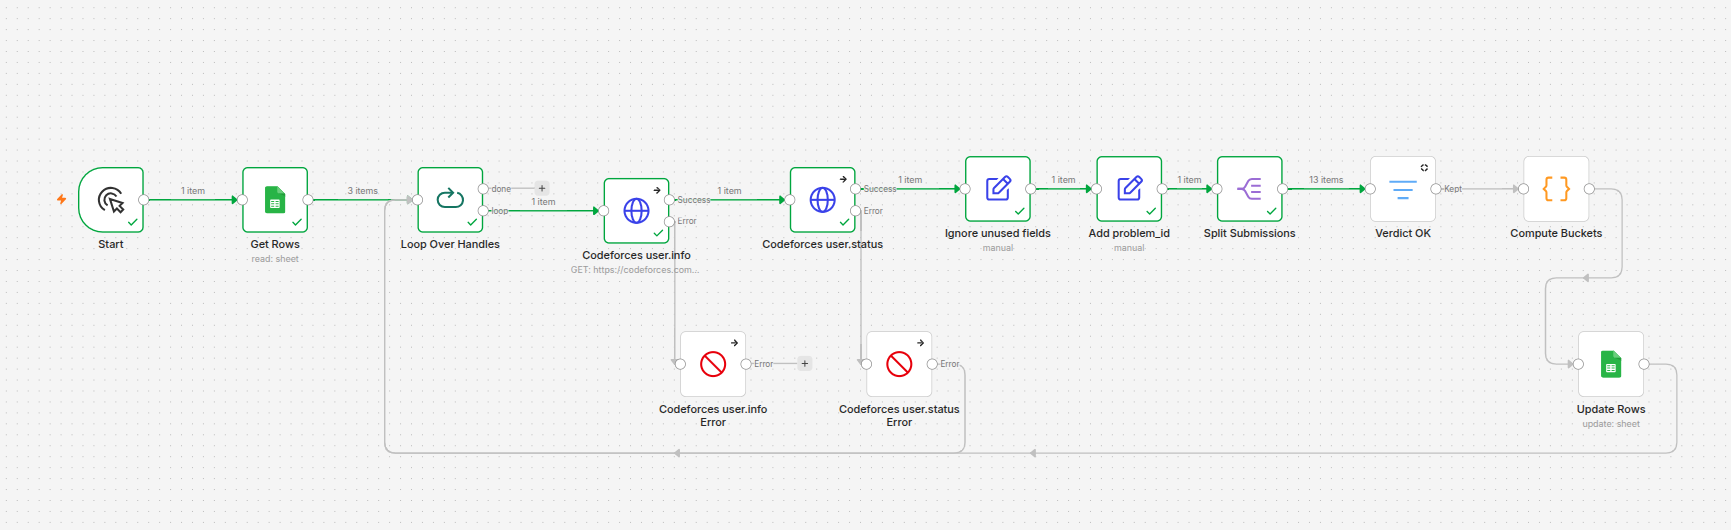
Back then, I ran these scripts locally. They grew quite long, and the overall process still involved several manual steps. Using n8n, I recreated a simplified version of this process in less than an hour. The workflow consists of four steps:
- Fetch the students’ Codeforces handles from a Google Sheet.
- Call the Codeforces API to retrieve their submissions and user info.
- Process the retrieved data and calculate the metrics.
- Update the same Google Sheet with the results.
Workflow nodes
An n8n workflow is built from nodes. It usually begins with a trigger node, followed by nodes that perform operations such as fetching, transforming, filtering, and updating data.
You can find the workflow JSON file at the link
The diagram below shows the workflow I created:
Trigger
A workflow begins with a trigger node. Unlike the nodes that follow it, a trigger does not receive input from another node. Instead, it determines when the workflow should begin. There are many types of triggers, such as:
- Manual Trigger: Starts the workflow when the user clicks a button. This is useful during development or when the workflow only needs to run on demand.
- Schedule Trigger: Runs the workflow at predefined times or intervals, for example, once a day at midnight.
- Webhook: Starts the workflow when it receives an HTTP request. For example, a CI/CD pipeline could call the webhook when a particular event occurs.
- Email Trigger: Starts when an email is received, including through IMAP.
- …
Ideally, this workflow would use a Schedule Trigger and run once a week. However, because I built it for testing purposes, I used a Manual Trigger.
Get Rows
The first step uses a Google Sheets node to retrieve the students’ Codeforces handles from a spreadsheet.
Configuring the node is straightforward, select the Get Row(s) operation, then specify the Google Sheets document and the sheet containing the data. To connect n8n to Google Sheets, you can authenticate using either OAuth 2.0 or a Google service account.
Loop Over Handles
n8n passes data between nodes as an array of items. Most nodes automatically process every incoming item, so an explicit loop is not always necessary. In this workflow, however, I used the Loop Over Items node to process the handles one at a time.
The node has two outputs:
- Loop: Sends the next batch of items through the loop. default batch size is
1. - Done: Runs after all the items have been processed and outputs the data collected from the completed iterations.
The final node inside the loop is connected back to the Loop Over Items node. This connection starts the next iteration. Once no items remain, the workflow continues through the Done output.
Codeforces user.info
This is the first node that calls the Codeforces API. It is an HTTP Request node, which can be used to send HTTP requests to external APIs.
You can configure the node manually by specifying the HTTP method and URL. Alternatively, you can use the Import cURL feature: provide a cURL command, and n8n will configure the corresponding request automatically.
For this request, the cURL command is:
curl --request GET --url 'https://codeforces.com/api/user.info?handles={{ $json.handle }}'
The expression {{ $json.handle }} retrieves the handle from the current input item. n8n evaluates it for each item before sending the request.
Codeforces user.info Error
An API request can fail, for example, when a handle does not exist or Codeforces is temporarily unavailable. By default, an error in the HTTP Request node stops the entire workflow. This behavior can be changed through the node’s On Error setting. n8n provides three options:
- Stop Workflow: Halt the execution and fail the workflow.
- Continue: Pass error message as an item in regular output.
- Continue (using error output): Pass the item to an extra error output.
For this workflow, I selected Continue (using error output) and connected the error path back to the Loop Over Items node. This allows the workflow to skip the failed request and continue with the next handle.
In a production workflow, this error path could send a notification through email or Slack, or record the failure in a separate sheet. To keep this example simple, I ignore the error and continue processing the remaining handles.
Codeforces user.status
The next HTTP Request node calls the Codeforces user.status endpoint, which returns the submissions made by a user. Once again, I configured the node using the Import cURL feature:
curl --request GET --url 'https://codeforces.com/api/user.status?handle={{ $("Loop Over Handles").item.json.handle }}'
The expression retrieves the handle of the item currently being processed by the Loop Over Handles node.
Due to API limitation, I had to add a Batching option with 2100 ms interval.
Codeforces user.status Error
Similar handling to the Codeforces user.info Error node.
Ignore unused fields
The Codeforces response contains many fields that are not needed for this workflow. I used an Edit Fields node to transform each submission into a simpler object containing only its verdict, problem name, problem rating, and user handle.
I configured the node to use a JSON output and added the following expression:
{{ $json.result.map(submission => ({
  verdict: submission.verdict,
  name: submission.problem.name,
  rating: submission.problem.rating,
  handle: submission.author.members[0].handle
})) }}
The map() function iterates over the submissions in the result array and creates a new object for each one, containing only the fields required by the following nodes.
Add problem_id
This is another Edit Fields node, although this could have been merged with the previous node, I decided to do it as a separate step. problem_id would be used to deduplicate solved problems, using name alone isn’t enough as there are some problems with same name, so I used combination of name and rating.
{{ $json.result.map(submission => ({
  verdict: submission.verdict,
  name: submission.problem.name,
  rating: submission.problem.rating,
  handle: submission.handle,
  problem_id: submission.name + " " + String(submission.rating),
})) }}
Split Submissions
The previous node outputs all the user’s submissions as a single array. To process each submission individually, I used a Split Out node.
The Split Out node takes the elements of an array and returns each one as a separate n8n item. Configuring it only required setting Fields To Split Out to result, which is the field containing the submissions array.
After this step, each output item represents a single submission and can be filtered or transformed independently.
Verdict OK
Next, I used a Filter node to keep only successfully solved problems. This node evaluates each input item against a specified condition and passes through only the items that satisfy it.
For this workflow, I configured the following condition:
- Value:
{{ $json.verdict }} - Operator: is equal to
- Expected value: OK
Compute Buckets
This is a Code node, you can write JavaScript code to do anything you want, this is a very helpful node to do complex tasks, I used it to calculate number of solved problems for each difficulty level, in addition to the total number of solved problems, used code is:
function emptyGroup() {
  return {
    seen: new Set(),
    solvedCount: 0,
    buckets: {
      r0_1200: 0,
      r1200_1400: 0,
      r1400_1600: 0,
      r1600_1900: 0,
      r1900_2100: 0,
      r2100_2400: 0,
      r2400_2700: 0,
      r2700_3000: 0,
      r3000_plus: 0,
    },
  };
}

const profiles = {};
for (const it of $('Codeforces user.info').all()) {
  const p = (it.json.result && it.json.result[0]) ? it.json.result[0] : null;
  if (p && p.handle) profiles[p.handle] = p;
}

const groups = {};
for (const handle of Object.keys(profiles)) {
  groups[handle] = emptyGroup();
}

for (const item of $input.all()) {
  const sub = item.json;
  const handle = sub.handle || null;
  if (!handle) continue;
  if (!groups[handle]) groups[handle] = emptyGroup();
  const rating = sub.rating;
  const problemId = sub.problem_id;
  if (groups[handle].seen.has(problemId)) continue;
  groups[handle].seen.add(problemId);
  if (rating === undefined || rating === null) continue;
  const b = groups[handle].buckets;
  groups[handle].solvedCount++;
  if (rating < 1200) b.r0_1200++;
  else if (rating < 1400) b.r1200_1400++;
  else if (rating < 1600) b.r1400_1600++;
  else if (rating < 1900) b.r1600_1900++;
  else if (rating < 2100) b.r1900_2100++;
  else if (rating < 2400) b.r2100_2400++;
  else if (rating < 2700) b.r2400_2700++;
  else if (rating < 3000) b.r2700_3000++;
  else b.r3000_plus++;
}

const out = [];
for (const handle of Object.keys(groups)) {
  const p = profiles[handle] || {};
  out.push({
    json: {
      handle: handle,
      firstName: p.firstName,
      lastName: p.lastName,
      rank: p.rank,
      maxRank: p.maxRank,
      rating: p.rating,
      maxRating: p.maxRating,
      solvedCount: groups[handle].solvedCount,
      ...groups[handle].buckets,
    },
  });
}
return out;
Update Rows
The final step uses another Google Sheets node to write the calculated values back to the original spreadsheet.
I configured the node with the following settings:
- Operation: Update Row
- Document: The target Google Sheets document
- Sheet: The sheet containing the student data
- Column to Match On:
handle - Mapping Column Mode: Map Each Column Manually
The handle column identifies which spreadsheet row should be updated, so each handle should be unique. I then manually mapped the fields produced by the Compute Difficulty Buckets node—such as rating, maxRating, solvedCount, and the individual difficulty buckets—to their corresponding spreadsheet columns.
Once this node finishes, the sheet contains the latest Codeforces profile information and problem-solving statistics for every processed student.
Development Notes
Pros
My first experience with n8n was very positive. I was particularly impressed by how quickly I could learn the basics and build a working automation. Despite being unfamiliar with the platform, I completed the workflow in less than an hour.
The AI assistant was also helpful while configuring and debugging the workflow. With clear, step-by-step documentation prepared in advance, I believe the same workflow could be recreated in approximately 15 minutes by importing the relevant configurations and making a few minor adjustments.
Debugging was straightforward because n8n makes it easy to inspect the input and output of each node. The platform also provides a wide range of nodes for AI, flow control, data transformation, triggers, and integrations with services such as Google Sheets, AWS, Slack, and Salesforce.
Cons
Some parts of the interface were initially difficult to navigate. In particular, I could not find a convenient way to keep the workflow canvas and the AI assistant open side by side. This may simply be a feature or shortcut that I have not discovered yet.
The browser tab also crashed twice while I was developing the workflow. Both crashes occurred while working with relatively large API responses, although I could not confirm whether the response size was the cause.
These were minor issues overall and did not prevent me from completing the workflow.
Conclusion
I had a great time building this workflow. Using the Codeforces API again felt nostalgic, and it was interesting to compare my old approach, long scripts and several manual steps with how much n8n simplified the process.
This was only my first experience with n8n, and I would still like to explore and compare it with other automation platforms. So far, however, my impression has been very positive, and I would give it a solid 9 out of 10.
I hope you liked this article as much as I enjoyed writing it. It has been a long time since I wrote something here. I have a few new ideas and will try my best to publish more frequently. Stay tuned for more! 😃